
Ingredients
For the Bars:
1 cup butter, softened
2 cups sugar
4 eggs
1 tsp vanilla extract
1/4 tsp almond extract
3 cups all-purpose flour
1 tsp salt
2 cans (21 oz each) cherry pie filling
For the Glaze:
1 cup powdered sugar
1/2 tsp vanilla extract
1/2 tsp almond extract
2 tbsp milk
Using these simple ingredients, you’ll create Cherry Pie Bars that taste just like the ones from your favorite bakery, but made fresh at home.
Step-by-Step Instructions
Preheat the Oven
Preheat your oven to 350°F (175°C). Grease a 15x10x1-inch baking pan or line it with parchment paper for easy cleanup.
ADVERTISEMENT
Cream Butter & Sugar
In a large bowl, cream the softened butter and sugar together using a hand mixer or stand mixer until light and fluffy.
ADVERTISEMENT
Add Eggs & Extracts
Beat in the eggs one at a time, making sure each is fully incorporated before adding the next. Stir in the vanilla and almond extracts to create a fragrant base.
Combine Dry Ingredients
In a separate bowl, whisk together the all-purpose flour and salt. Gradually add to the butter mixture, mixing until just combined without over-mixing.
Assemble the Bars
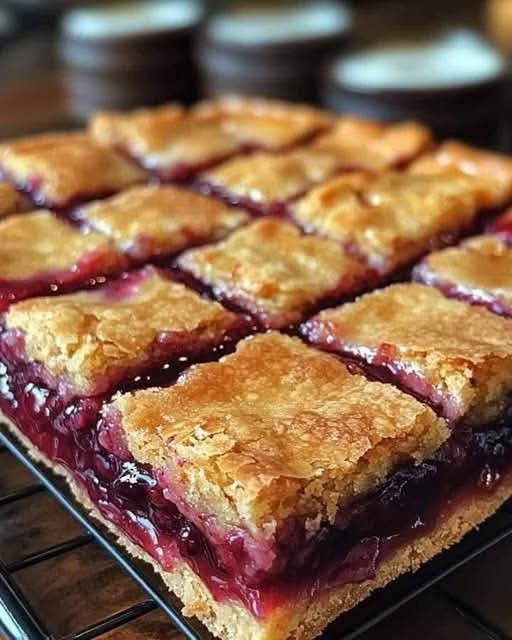
Spread about 3 cups of the batter into the prepared baking pan. Carefully spoon the cherry pie filling over the batter and spread it evenly. Drop spoonfuls of the remaining batter over the top, allowing some cherry filling to peek through.
Bake
Bake in the preheated oven for 30-35 minutes, or until a toothpick inserted into the center comes out clean. If using a 9×13-inch pan, baking may take an additional 5-10 minutes.
ADVERTISEMENT
Cool
Allow the Cherry Pie Bars to cool completely on a wire rack before glazing.
Prepare the Glaze
In a small bowl, whisk together the powdered sugar, vanilla extract, almond extract, and milk until smooth and pourable.
Glaze & Serve
Drizzle the glaze evenly over the cooled bars. Once the glaze sets, cut the bars into squares and serve.
To complement your dessert table, try this easy Coconut Blender Cake that requires no complex tools for another quick family favorite.
Tips & Variations
Use full-fat butter for a richer taste and better texture.
Swap cherry pie filling for blueberry, apple, or peach for seasonal variety.
Add 1/2 cup chopped walnuts or almonds before baking for a crunchy finish.
Serve warm with vanilla ice cream for a comforting dessert.
For a no-bake version, layer the ingredients over a graham cracker crust and chill overnight.
For additional dessert inspiration, explore Delish’s easy dessert recipes collection for seasonal ideas.
Storage Instructions
Room Temperature: Store in an airtight container for up to 3 days.
Refrigerator: Store for up to 5 days for extended freshness.
Freezer: Wrap individual bars and freeze for up to 2 months. Thaw at room temperature before serving.
Time & Yield
Prep Time: 15 minutes
Cook Time: 35 minutes
Total Time: 50 minutes plus cooling
Yield: 24 bars
Tools Used
Mixing bowls
Hand or stand mixer
Measuring cups and spoons
15x10x1-inch baking pan
Whisk
Wire rack
Nutrition Information (Per Bar)
Calories: 250
Fat: 10g
Carbohydrates: 38g
Protein: 3g
Sugar: 22g
Serving Ideas
Pair your Cherry Pie Bars with coffee during brunch.
Serve as a dessert at family gatherings or holiday parties.
Cut into smaller squares for potlucks.
Add to lunchboxes as a sweet treat.
If you’re looking to expand your dessert collection, check out our No-Bake Creamy Cheesecake recipe for a fuss-free dessert that pairs beautifully with fruit-based desserts like these bars.
Frequently Asked Questions
Can I use fresh cherries instead of canned cherry pie filling?
Yes, cook them down with sugar and cornstarch until thick before using as filling.
Can I double the recipe for larger gatherings?
Absolutely! Use two pans or a large sheet pan.
How do I know when the bars are done?
Insert a toothpick into the center; if it comes out clean, your Cherry Pie Bars are ready.
For advanced baking tips and variations, explore AllRecipes’ guide to bar and square desserts.
Final Thoughts
These Cherry Pie Bars are a timeless dessert that combines a flaky, buttery crust with vibrant cherry filling and a sweet glaze, making them perfect for gatherings, brunches, or as a special treat with coffee. With simple ingredients and easy steps, you can bring bakery-quality desserts to your kitchen effortlessly.
ADVERTISEMENT
